If you’re a data scientist, data engineer or otherwise someone just starting to think about creating data pipelines, you could do a lot worse than check out make. Having a consistent and flexible way of executing your data pipeline should be an essential part of any data professionals toolkit.
If you’re running macOS or Linux, chances are that you already have make installed. You may even have used it already when compiling a piece of software from source, since make was originally intended to help users ‘make’ or compile complex software projects.
That doesn’t mean that it doesn’t also make for a great tool for those of us working on data projects though. Using make allows you to effectively script up a bunch of the things that you perhaps already do by hand. If you have a multi-stage data project, using make can be a real productivity boost.
Using a Makefile to describe the steps in the workflow and their dependencies in your project can reduce costly mistakes and improve reproducibility.
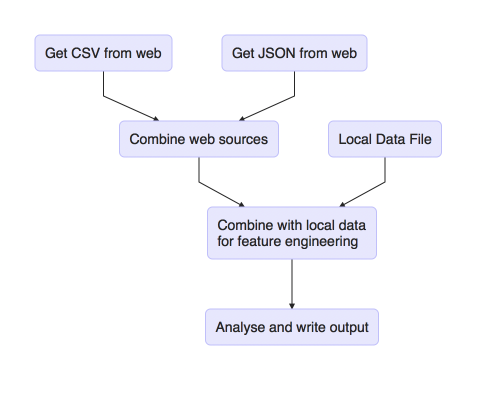
Imagine a project where you have the following steps:
- Download a csv file from the web (shell script)
- Download a json file from the web (Python script)
- Combine these web sources (Python script)
- Web sources are now combined with a local data file for feature engineering (R script)
- This is then analysed and the results written out (R script)
We therefore have 5 script files and 1 data file. The scripts must be executed in the correct order and some of them depend on outputs of previous stages. Tying all this together and getting it all to run consistently and in the correct order could be a bit of a headache.
In essence, what we have is a directed acyclic graph or DAG.
We could visualise these steps, using R, as follows:
library(DiagrammeR)
mermaid("
        graph TB
        A(Get CSV from web)-->D(Combine web sources)
        B(Get JSON from web)-->D
        D-->E(Combine with local data<br>for feature engineering)
        C(Local Data File)-->E
        E-->F(Analyse and write output)
        ")
The fantastic thing about make is that it provides a syntax for describing the graph and a way of executing it. It’s capable of executing all or part of the graph and will do so consistently and repeatably. There are even techniques we can use to clean up after ourselves.
If we take the example outlined above and turn it into a Makefile, it would look something like this:
# Run my awesome analysis pipeline
.PHONY : all
all : output_file.html

downloaded_file.csv : download-csv.sh
	./download-csv.sh

downloaded_file.json : download-csv.py
	./download-csv.py

combined_web.csv : downloaded_file.csv downloaded_file.json combine_web.py
  ./combine-web.py

final_dataset.csv : localdata.json combined_web.csv feature-eng.R
  ./feature-eng.R

output_file.html : final_dataset.csv analyse.R
  ./analyse.R

.PHONY : clean
clean :
	-rm output_file.html final_dataset.csv combined_web.csv downloaded_file.*
I’m not going to turn this post into a tutorial (there’s a better resource for that at the end), but to break down one of the rule-sets, let’s examine it more closely.
Specifically, this one:
output_file.html : final_dataset.csv analyse.R
  ./analyse.R
The general make-up of a make rule works like this:
target-file : dependency-file1 dependency-file2
  action to take
What this means is that each rule defines a target file that it is responsible for creating, zero or more files which are dependencies and zero or more actions to take to create that target file.
This is incredibly powerful as make can then use this information to execute all or part of the graph if any of your script files change. This is because make uses the timestamps of files to decide what work needs to be done. If the timestamp of a dependency is newer than the timestamp of the target (or if the target doesn’t exist at all) then the action is run.
The example Makefile I’ve outlined above also defines a ‘clean’ rule, that can be used to clean up files created by your pipeline. Since this clean up process is scripted, running it is straightforward and consistent.
Tips and more information
You can use make in the simplest of projects, so you can get started with a single rule. Once you’re happy with the single rule, you can start adding additional complexity as your project grows.
Many popular IDEs, like RStudio, understand make and can use it to ‘build’ and ‘clean’ projects. RStudio even has syntax highlighting for Makefiles built in.
If you don’t have a natural target for an action that you need to take – maybe it writes to a database or something instead of a file – consider using a logfile as the target. That way you get the same benefits as with a standard file based target.
As you’ve probably realised if you’ve made it this far, make is a command-line-centric tool. If you’re an R user and need a guide to getting your scripts to run on the command line, try this one.
There are other tools that perform similar functions to make, but where make really outshines the others is with its language agnostic approach and its ubiquity. It will run anything that can be executed on the command line and you’ll find it already installed in lots of cases. This means it’s great for inclusion with continuous integration and deployment pipelines.
Finally, my favourite guide to learning make’s syntax, and the one I return to every time I forget the syntax again, is this one from the Software Carpentry team. It’s an excellent resource, and well worth reading through for a deeper understanding.
I hope you’ll consider giving make a try. The syntax stumped me for a long time before the penny finally dropped, but I’ve used it on lots of projects since and found it really helpful.